


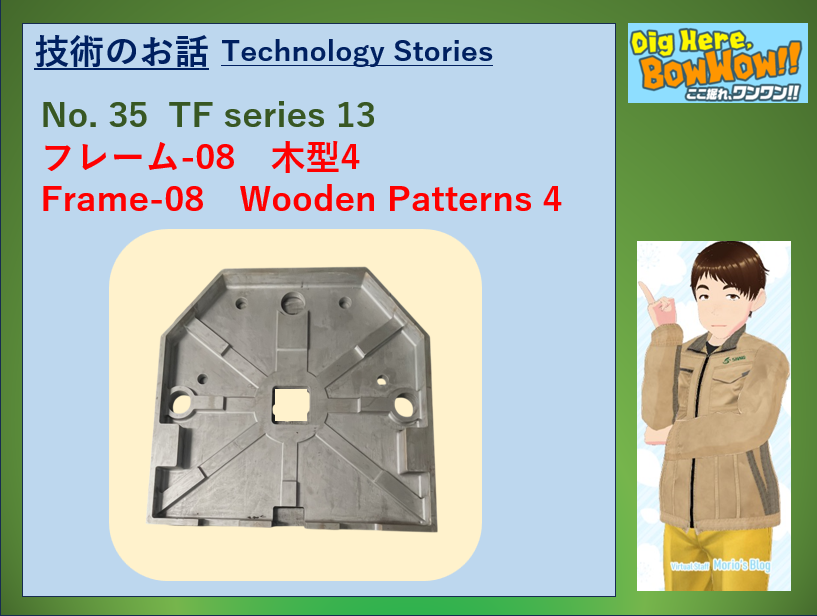
No.35 TF-13 フレーム8 木型4
🐾 こんにちは、もりおです!
いよいよ最終章!
これまで、
- 木型ってなに?(現型・割り現型・マッチプレート)
- どうやって砂型を作るの?
- 中子(なかご)ってどう使うの?
といった内容をお届けしてきましたが…
今回は!
🎉 **「実際に注湯して、どんな風に鋳物ができあがるのか?」**をご紹介します!!
🔥 1. 注湯(ちゅうとう)って?
「注湯」とは、溶かした金属(湯と呼ばれてます)を砂型の中に流し込む作業のことです!
例えば、TFシリーズのフレームをつくる場合、FC250などのねずみ鋳鉄を約1,300℃で溶かしてから、砂型の中に流し込みます。
このときのポイントは…
🛠️ 一気に流し込む!
温度が下がると途中で固まってしまうため、勢いとタイミングが大事!
🪨 2. 鋳物ができあがるまで
ざっくりと流れはこんな感じです:
⏳ ステップ1:中子・上下型を組み合わせる
前回ご紹介した中子(中の空洞を作るパーツ)を砂型にセットし、上下の型をピタッと合わせてクランプで固定!
🔥 ステップ2:注湯!
溶けた鉄(湯)を、**湯口(ゆぐち)**と呼ばれる入り口から、ジョロジョロ〜っと流し込みます。
このとき、**空気が抜けるような構造(湯道やガス抜き)**もちゃんと設計されています!
❄️ ステップ3:冷却
溶けた鉄(湯)が固まるまで、じっくり自然冷却します(製品の大きさや形状によっては数時間〜半日かかることも!)
🔨 ステップ4:型ばらし(鋳型割り)
冷えて固まったら、砂型を割って中からフレームの元(鋳物)が登場!
…ですが、この時点ではまだ「バリ」や「湯口のあと」がついていて、ちょっとごつごつしています。
✨ 3. 完成形への道(仕上げ工程)
取り出した鋳物には以下の仕上げ工程があります:
| 工程 | 内容 |
| 🧹 ショットブラスト | 表面の砂やスケールを除去 |
| ✂️ バリ取り・ゲートカット | 余計な部分を削り取る |
| 📏 寸法検査 | 変形や欠陥がないか確認 |
| 📦 予備加工・機械加工 | 必要な部分を切削・仕上げ |
TFシリーズの場合、リブの精度や厚みの均一性がとっても大事なので、鋳物の段階でしっかり品質を確保しておきます!
📝 まとめ
というわけで、「木型」から始まった一連の流れが…
木型づくり → 砂型成形 → 注湯 → 冷却 → 型ばらし → 仕上げ加工
という工程を経て、ようやく機械の“骨格”ができあがるんですね!
🐾 もりおのひとこと
鋳物って、まるでお菓子の型抜きみたいで楽しいでしょ?
でも実際には、温度・形状・タイミングのすべてが技術と経験に支えられていて、一つの鋳物ができるまでに多くの人の力が関わっているんです。
TFのフレームも、そんな職人技の結晶なのです!
ではまた、次回「ここ掘れ、ワンワン!!」でお会いしましょう🐾
※本ブログは生成AIを活用して作成しています。
No.35 TF-13 Frame-8 Wooden Patterns 4
🐾 Hello, it’s Morio!
At last, we’ve reached the final chapter!
So far, we’ve covered:
-What’s a wooden pattern? (solid pattern, split pattern, match plate)
-How is a sand mold made?
-How are cores used?
And now—drum roll please!
🎉 Let me walk you through how casting is done through actual pouring!
🔥 1. What is Pouring?
“Pouring” refers to the process of pouring molten metal (which we call yu, or “the melt”) into a sand mold.
For example, to cast a TF series frame, gray cast iron like FC250 is melted at around 1,300°C, then poured into the prepared sand mold.
🔧 The key point here is…
🛠️ Pour it all at once!
If the temperature drops mid-way, the metal could solidify before filling the mold properly. So momentum and timing are critical!
🪨 2. How the Casting Is Formed
Here’s a rough overview of the process:
⏳ Step 1: Assemble the Core and Mold Halves
Insert the core (the part that creates internal cavities) into the mold, then clamp the top and bottom mold halves together tightly.
🔥 Step 2: Pouring!
Molten iron is poured through a designated pouring gate (yuguchi) in a smooth stream.
The mold is designed with runners and gas vents to allow air to escape as the metal fills the cavity.
❄️ Step 3: Cooling
Let the metal cool and solidify naturally.
Depending on the product size and shape, this can take several hours to half a day.
🔨 Step 4: Mold Breaking (Shakeout)
Once the metal has fully cooled, the sand mold is broken apart and the casting is revealed!
At this point, the casting still has excess material such as flash and pouring gates, making it look a bit rough.
✨ 3. Finishing the Casting
After removal, the casting goes through several finishing steps:
| Process | Description |
|---|---|
| 🧹 Shot Blasting | Removes sand and scale from the surface |
| ✂️ Deburring & Gate Removal | Cuts off any unwanted excess |
| 📏 Dimensional Inspection | Checks for defects or deformation |
| 📦 Pre-Processing / Machining | Cuts and finishes necessary areas |
For the TF series, accuracy and uniform thickness in the ribs are crucial—so we ensure high quality even at the casting stage!
📝 Summary
From the wooden pattern to final machining, the full sequence looks like this:
➡️ Wooden Pattern Making
➡️ Sand Mold Forming
➡️ Pouring
➡️ Cooling
➡️ Mold Breaking
➡️ Finishing
Only after all that do we finally have the “skeleton” of the machine!
🐾 Morio’s Note
Casting kind of feels like making cookies with a mold, don’t you think? 🍪
But in reality, temperature, shape, and timing all require high-level skill and experience.
Many hands are involved to bring just one casting to life.
The TF frame is truly the result of expert craftsmanship!
See you again in the next edition of
“Dig Here, Bowwow!!” 🐾
This blog post was created with the help of generative AI.